How to Choose a Celestron Edge HD 8 Focal Reducer
Choose a Celestron EdgeHD 8 focal reducer made for the EdgeHD optical design, then confirm its reduction factor, sensor coverage, and required back focus. A reducer that fits the rear thread can still give poor results if the spacing or image circle is wrong.
On this page (13 sections)
- Why does the EdgeHD 8 need a dedicated focal reducer?
- What does a focal reducer change on an EdgeHD 8?
- How do you check optical compatibility?
- How does sensor coverage affect the choice?
- What is back focus, and why does spacing matter?
- How should you choose the reduction factor?
- What mechanical parts do you need around the reducer?
- What mounting accessories can help with the full setup?
- How do you calculate the camera field of view?
- What mistakes should you avoid?
- How do you test the setup before a full imaging session?
- How should you compare an EdgeHD 8 reducer with native imaging?
- Final decision rule for a Celestron Edge HD 8 focal reducer
The right Celestron EdgeHD 8 focal reducer is an EdgeHD-specific model with a reduction factor and back-focus requirement that match your camera train. Start with optical compatibility, then check the reducer's corrected image circle, sensor coverage and the exact distance from the reducer to the camera sensor.
A focal reducer changes more than one number. It affects the telescope's effective focal length, field of view, image scale, exposure needs and the amount of space available for adapters behind the telescope.
Before comparing accessories, it helps to understand the telescope design. [What Is a Catadioptric Telescope?
Explained](/what-is-a-catadioptric-telescope/) covers how a Schmidt-Cassegrain-style system combines mirrors and a corrector plate.
Why does the EdgeHD 8 need a dedicated focal reducer?
The EdgeHD 8 uses a corrected optical design, so the reducer should be matched to that design. A reducer made for a standard SCT is not automatically a good match for an EdgeHD telescope, even if it attaches to the same rear opening.
The reducer sits between the telescope and the camera. Its optical elements change the light cone and are intended to preserve a usable field across the camera sensor.
If the reducer and telescope are not designed to work together, stars near the edge may appear stretched, soft or unevenly illuminated.
Mechanical fit is only the first check. A threaded accessory can attach securely while still producing an optical mismatch.
The telescope's native focal length also affects the decision. If you need a refresher, What Does Focal Length Mean on a Telescope? explains how focal length changes magnification and field of view.
What does a focal reducer change on an EdgeHD 8?
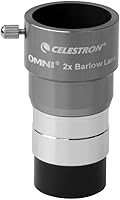
A focal reducer shortens the effective focal length, so the camera sees a wider section of the sky. The reduction factor tells you how much the focal length changes, while the sensor size determines how much of that wider field the camera records.
For a simple example, a 0.7x reducer makes the effective focal length about 70% of the telescope's original focal length. The exact working result can vary with the optical spacing and the system's design, so use the reducer's stated specifications for final planning.
The main effects are:
- A wider field of view.
- A smaller image scale in arcseconds per pixel.
- A shorter effective focal ratio.
- Less magnification for the same camera.
- More sky area in one frame.
- Greater sensitivity to spacing and edge performance.
A wider field can make large nebulae, open clusters and extended galaxies easier to frame. It can also make small targets look smaller on the sensor.
A reducer does not turn an EdgeHD 8 into a different aperture. The telescope still gathers light through its original primary mirror, but the reduced focal ratio changes how that light is distributed across the image.
How do you check optical compatibility?
Check the reducer's telescope compatibility before checking thread adapters. The product description should identify the EdgeHD 8, rather than only saying that the reducer fits an SCT or a particular rear thread.
Use this order:
- Confirm that the reducer is made for the EdgeHD 8.
- Confirm the reduction factor.
- Check the corrected image circle or supported sensor size.
- Find the required back-focus distance.
- Measure every component in the camera train.
- Confirm that the mechanical threads and clearances match.
The first step protects against a common mistake: choosing by connector size alone. The second and third steps tell you whether the reducer suits your imaging goal and camera.
The corrected image circle matters because the reducer's performance may be strongest near the center. A sensor that extends beyond the corrected area can record softer corners, elongated stars, vignetting or uneven brightness.
If you are comparing the EdgeHD 8 with another Schmidt-Cassegrain size, our guide to an 8 inch Schmidt-Cassegrain telescope explains the broader design and buying factors.
How does sensor coverage affect the choice?
Choose a reducer whose corrected field covers the part of the sensor you plan to use. A smaller sensor is easier to cover, while a large sensor places more demand on the reducer's corrected image circle and spacing.
Sensor coverage has several parts:
- Sensor width and height.
- Sensor diagonal.
- The camera's active imaging area.
- The reducer's corrected image circle.
- Vignetting from adapters or narrow openings.
- Edge star shape at the intended spacing.
A camera can record an image even when the outer field is not well corrected. That is why a basic connection test does not prove that the system is optically matched.
The sensor diagonal is especially useful for a quick comparison. If the diagonal approaches or exceeds the reducer's corrected field, inspect sample images or manufacturer guidance carefully before committing to that camera and reducer combination.
Vignetting and optical correction are separate concerns. A field may be sharp but dark at the edges, or evenly lit but visibly soft in the corners.
Cropping can hide some edge problems, but it also reduces the final field of view. If your goal is to capture a large object in one frame, choose coverage before relying on later cropping.
What is back focus, and why does spacing matter?
Back focus is the required distance between a reference point on the reducer and the camera sensor. The camera sensor must sit at the reducer's specified distance, not simply at the end of whatever adapters happen to fit.
Your optical train may include:
- The telescope's rear connection.
- The focal reducer.
- A visual back or camera adapter.
- Extension tubes.
- A filter drawer or filter wheel.
- An off-axis guider.
- A camera nosepiece or camera body.
- The sensor itself.
Add the optical lengths of these parts to estimate the sensor position. The camera body's stated flange distance may also be part of the calculation, depending on the connection method.
Do not assume that a longer train is better. Too much spacing can change the reduction factor and degrade correction, while too little spacing can also move the system away from its intended performance.
Filters can add optical path length because light travels through glass. The amount depends on the filter and the optical arrangement, so account for the filter accessory when building the train.
Draw the train from the telescope to the sensor and write each length beside the component. This simple record makes it easier to find the cause if the spacing is wrong later.
How should you choose the reduction factor?
Choose the reduction factor by balancing field of view, target size and camera sampling. A stronger reduction gives a wider field, but it also makes small targets occupy fewer pixels.
A lower effective focal length can help when:
- The target is wider than the camera's native field.
- You want shorter framing time for large objects.
- Your mount tracks more comfortably at a shorter focal length.
- You want a faster imaging setup.
- You need a more forgiving image scale for guiding.
A longer effective focal length can help when:
- The target is small.
- You want more pixels across a compact galaxy or planetary nebula.
- The camera sensor is already large enough for the target.
- You need more image scale for detailed framing.
The reducer does not remove the need for accurate tracking. A wider field may make small tracking errors less obvious, but stars can still trail if the mount or guiding setup is not accurate enough.
Think in terms of the target's angular size. A reducer is useful when the native field is too narrow, but it may be counterproductive if your main targets already fit comfortably and need more image scale.
What mechanical parts do you need around the reducer?
You need a secure, compatible connection from the telescope to the reducer and from the reducer to the camera. The optical reducer cannot correct a camera train that flexes, tilts or shifts during an imaging session.
Check each connection for:
- Correct thread type.
- Correct gender and diameter.
- Enough thread engagement.
- A flat seating surface.
- Clearance around the camera.
- No contact with the mount or accessories.
- A camera angle that can be locked.
Tilt can make one side of the frame look worse than the other. A loose adapter can also change the spacing while the telescope moves across the sky.
Keep the train as short and rigid as the required back focus allows. Avoid stacking unnecessary adapters simply because they are available.
Cable weight can pull on the camera train as the mount moves. Route cables so they have enough slack for motion but do not hang heavily from the camera connection.
What mounting accessories can help with the full setup?
A reducer belongs in the optical train, but the camera and telescope still need a stable mounting arrangement. If you are choosing the telescope mount too, compare fork-mounted telescope options.
Mounting accessories help keep the telescope and imaging equipment balanced, aligned and securely attached.
The Sky-Watcher Sky Watcher S20530 Star Adventurer Latitude is a Star Adventurer accessory with a V-style dovetail plate, micro-adjustment knobs and a latitude adjustment lock. It includes a Star Adventurer Latitude base, mounting block, instructions and tool kit, and its black aluminum body measures 5.5 x 5.5 x 5.5 in.
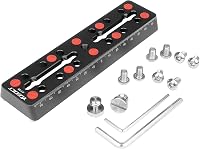
The Yueoct 160mm/6.3" Telescope Rail Bar Vixen Style is a 160 mm, or 6.3 in, Vixen-style mounting plate. It has long slots, M6 and 1/4 in countersunk bores, 3/8 in threaded holes, a center 1/4 in threaded hole, anti-slip rubber pads and safety stop screws.
The Astromania Medium Telescope Dovetail Mounting Clamp has a 25 mm clamping surface, one brass screw and mounting holes for M6 and 1/4 in screws. It accommodates accessory widths from 29 to 46 mm and is designed for Vixen dovetail mount plates.
These accessories do not replace the reducer or set its optical spacing. Treat them as separate mechanical parts: the reducer controls the optical system, while the mounting hardware supports the telescope and connected equipment.
How do you calculate the camera field of view?
Estimate the camera field of view from the sensor dimensions and the telescope's effective focal length. The reducer widens the field by shortening the effective focal length, but the sensor still sets the size of the recorded frame.
A simple angular estimate is:
field of view in degrees = sensor dimension ÷ effective focal length × 57.3
Use the sensor's width for horizontal field and height for vertical field. Keep both measurements in the same units.
This estimate is useful for planning, but it does not show edge correction, vignetting or the exact shape of the usable field. Those depend on the reducer, sensor and spacing.
You can compare the estimated field with the target's published angular size. Leave some framing room for rotation, guiding crops and later processing rather than fitting the target exactly to the edges.
For a different EdgeHD example, see What Is the Focal Length of a Celestron EdgeHD 9.25?. The same field-of-view method applies, but the larger telescope has different native optical dimensions.
What mistakes should you avoid?
The most common mistake is choosing a reducer by thread fit alone. A secure thread connection does not prove that the reducer is optically correct for the EdgeHD 8.
Avoid these errors:
- Using a standard SCT reducer without confirming EdgeHD compatibility.
- Ignoring the reducer's required back focus.
- Measuring to the camera housing instead of the sensor.
- Forgetting filter wheels, drawers or off-axis guiders.
- Assuming every sensor receives the same corrected field.
- Adding extension tubes without recalculating spacing.
- Using a large sensor without checking the corrected image circle.
- Letting the camera train flex under cable weight.
- Treating a wider field as automatically better for every target.
- Focusing only on the reducer and ignoring mount balance.
A reducer can also change focus position and the amount of clearance behind the telescope. Check that the complete camera train can move without striking the mount, tripod or other equipment.
How do you test the setup before a full imaging session?
Start with a daylight mechanical check, then use a short night-time exposure to inspect the field. Confirm attachment, focus, spacing and corner performance before planning a long sequence.
Use this order:
- Assemble the reducer and camera train with the intended filters.
- Check that every threaded connection is fully seated.
- Confirm that cables do not pull on the camera.
- Point at a bright star field after dark.
- Focus near the center of the frame.
- Capture a short exposure.
- Inspect the center and all four corners.
- Check for elongated stars, uneven brightness and dark edges.
- Confirm that the camera remains secure as the mount moves.
- Record the final spacing and camera orientation.
A short exposure cannot prove long-session tracking quality, but it can reveal a spacing or optical problem before you waste a night of data.
If one corner looks worse than the opposite corner, investigate tilt or mechanical seating. If all corners show similar distortion, revisit reducer compatibility, spacing and the corrected image circle.
How should you compare an EdgeHD 8 reducer with native imaging?
Compare the reducer setup with the telescope at its native focal length using the same camera and target when possible. The reduced setup favors wider framing and a shorter effective focal length, while the native setup favors more image scale.
The native configuration may suit compact targets that already fit the camera. The reduced configuration may suit large targets or situations where the native field is too narrow.
Your mount also affects the choice. A longer effective focal length places more demand on tracking and guiding accuracy because the same movement covers more pixels.
Keep both configurations available if your targets vary. A reducer is a field-of-view tool, not a universal replacement for the telescope's native configuration.
Final decision rule for a Celestron Edge HD 8 focal reducer
Choose a Celestron Edge HD 8 focal reducer that is made for the EdgeHD 8 optical design, then match its reduction factor to your target size and its corrected field to your camera sensor. Confirm the complete back-focus measurement with filters, adapters and guiding accessories included.
If your camera train cannot meet the required spacing, choose different adapters before changing the reducer. If your target already fits at native focal length, compare image scale before reducing the system.
For a wider equipment decision, the Celestron NexStar Evolution 9.25 review gives another example of how telescope size, mount design and intended use affect accessory choices.
Frequently asked questions
What focal reducer fits a Celestron EdgeHD 8?
Use a focal reducer designed for the Celestron EdgeHD 8 optical system, not a generic reducer chosen only by thread size. Confirm that the reducer supports the EdgeHD design, then match its back-focus requirement to your camera, adapters and filter accessories.
What does a focal reducer do on an EdgeHD 8?
A focal reducer shortens the telescope's effective focal length and widens the field of view. It can also make a camera system faster for imaging, but the result depends on correct spacing, sensor coverage and whether the reducer is designed for the EdgeHD 8.
How much back focus does an EdgeHD 8 reducer need?
The required back focus depends on the specific reducer. Use the reducer maker's stated distance from the reducer reference surface to the camera sensor, then add the optical path of adapters, filter wheels, off-axis guiders and any other accessories.
Can I use a generic SCT focal reducer on an EdgeHD 8?
A generic SCT reducer may attach to the telescope but does not automatically correct the EdgeHD optical system. For imaging, choose a reducer identified for the EdgeHD 8 and verify sensor coverage and spacing before building the camera train.
Will a focal reducer work with every EdgeHD 8 camera?
No. Camera size, sensor shape, diagonal, spacing and the reducer's corrected image circle all matter.
A small sensor may fit comfortably inside the corrected field, while a larger sensor can show edge softness or illumination loss if the system is not matched.