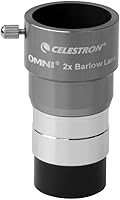
How to Collimate a Laser Collimator
Collimate a laser collimator by checking whether its beam stays on one spot as the tool rotates, then making small adjustments to its alignment screws. Repeat the rotation check until the beam no longer traces a circle.
On this page (9 sections)
- How do you check whether a laser collimator is aligned?
- What do you need before adjusting the laser?
- How do you collimate a laser collimator step by step?
- Why does the beam move even when the laser is aligned?
- How close does the beam need to stay?
- What should you do if the screws do not fix the beam?
- What should you check after collimating the laser?
- How do you collimate a laser collimator safely?
- How to collimate a laser collimator: what is the final check?
To collimate a laser collimator, secure it, aim at a target, rotate it, and adjust its alignment screws until the beam stays in one spot. A beam that traces a circle as the tool turns indicates that the laser is off center, assuming the collimator is held firmly.
This check matters before you use the tool to align a telescope. A misaligned laser can send you toward the wrong mirror adjustment, so confirm the laser itself first.
How do you check whether a laser collimator is aligned?
Rotate the collimator in a stable support and watch whether the beam stays still. If it moves in a circle, the laser axis does not line up with the tool's center.
A V-block made for this purpose can support the barrel while allowing it to turn. You can also use a firm, level surface and a stable way to hold the collimator, as long as it cannot wobble or slide.
Aim at a wall or target several feet away. Mark the beam spot, then rotate the collimator slowly through a full turn without changing its position.
A small movement can come from a loose fit or an uneven support, so check the setup before adjusting anything. The barrel should rest consistently, and the target should not move during the test.
What do you need before adjusting the laser?
Use a stable support, a target, the correct small driver, and the collimator's instructions. The adjustment screws are small, and the right method varies by model.
Place the support on a steady surface and make sure the beam points toward a safe target. Keep the beam below eye level, and never look into the aperture or direct it at anyone.
Find the adjustment screws on the collimator body. Some models cover them with caps or seal them; if yours does, follow the maker's service instructions rather than forcing access.
The Altura Photo kit includes a cleaning brush, air blower, lens pen, cleaning cloths, and tissue wipes. Those tools may help remove loose dust from camera lenses and accessories, but they are not laser alignment tools.
Keep cleaning tools away from the collimator's laser aperture and internal parts. Do not spray cleaner into the barrel or open the housing to clean it.
How do you collimate a laser collimator step by step?
Make tiny screw adjustments, checking the beam after each change. The goal is to reduce the circle traced during rotation until the beam remains in one place.
- Seat the collimator in the support so it cannot rock.
- Aim the beam at a clear target several feet away.
- Rotate the tool slowly and note the direction and size of the beam's circle.
- Stop rotating, then turn one adjustment screw a very small amount.
- Rotate the tool again and watch whether the circle shrinks.
- Repeat with small changes until the spot stays nearly fixed.
- Tighten any screw caps or retainers only as the instructions direct, then test again.
Adjust only one screw at a time, and keep track of each change. If the spot moves farther from the center or the circle grows, reverse the last small adjustment.
Don't use force. If a screw will not turn smoothly, stop and check the tool's instructions; a damaged adjuster can make the collimator unreliable.
Why does the beam move even when the laser is aligned?
A loose barrel, unstable support, or target movement can make a good laser appear misaligned. Eliminate those sources of movement before turning any screws.
Check that the collimator sits in the same position throughout the rotation. A focuser adapter or sleeve that allows the barrel to tilt can shift the beam independently of the laser alignment.
Use a support that lets the tool rotate around its barrel axis without lifting or sliding. If the target is a sheet of paper, tape it down so it cannot move.
Try the rotation check again at a nearer target if the spot is difficult to see. A closer target makes small movements easier to track, though you should still use a stable setup.
How close does the beam need to stay?
The beam should show little or no movement as the collimator rotates. A visible circle means the tool may not give a dependable reference for telescope adjustments.
There is no single tolerance that applies to every laser collimator and telescope. Follow the collimator's own guidance, and avoid treating a beam that visibly sweeps across the target as centered.
The beam's distance from the target also affects how easy it is to see a small shift. Keep the test setup consistent while adjusting so you can tell whether each change improves alignment.
What should you do if the screws do not fix the beam?
Stop adjusting if the screws are sealed, damaged, or unable to hold the beam steady. Contact the manufacturer or replace the tool if it cannot maintain alignment.
Check the collimator's instructions for adjustment access and service options. Avoid opening the housing, using excess force, or changing multiple screws at once.
If the beam still shifts after careful adjustments, check whether the barrel is bent or the support is unstable. A damaged tool may not be suitable for accurate telescope alignment.
The K&F CONCEPT cleaning kit includes an air blower, lens cleaning pen, and microfiber cloths for delicate camera and electronic surfaces. It can help with ordinary exterior dust care, but it does not correct laser alignment.
Do not use the blower or pen inside the laser collimator. Keep the optical tool intact and use its manufacturer’s repair guidance for internal problems.
What should you check after collimating the laser?
Repeat the full rotation test after the final adjustment and after securing any covers. The beam should remain in the same spot when the tool turns.
If the spot shifts again, repeat the small adjustment process or check for a loose retainer. Recheck the collimator after a hard knock or rough transport, since impact can change its alignment.
Once the laser itself holds alignment, you can use it to check your telescope. The process of how to collimate a telescope explains the optical adjustments, while how to use an Apertura laser collimator covers using that style of tool in a telescope.
For the underlying principle, read how a laser collimator works. If you are comparing a model, see our SVBONY laser collimator review.
How do you collimate a laser collimator safely?
Keep the beam away from eyes and reflective surfaces, and point it only at a safe target. Never look into the laser aperture, even if the beam seems dim.
Follow the safety instructions that came with the collimator. Turn the laser off when you are not actively checking the beam, and store the tool where children cannot use it unsupervised.
A laser collimator is intended for telescope alignment, not for observing the sky. For a refractor, use the appropriate refractor telescope collimation guide because its alignment process differs from a reflector's.
How to collimate a laser collimator: what is the final check?
Use the laser only after it passes a steady rotation check. If the beam stays on one spot while the collimator turns, it is ready to provide a more dependable reference for telescope alignment.
If the beam traces a circle, check the support and barrel fit, then make small adjustments and test again. Choose a model-specific repair or replacement path if its screws are inaccessible or cannot hold alignment.
Keep the collimator protected between sessions and recheck it after impact. A quick rotation test helps you know whether its beam is still centered before you adjust telescope optics.
Frequently asked questions
How do you know if a laser collimator is out of alignment?
Secure the collimator in a V-block or another stable support and aim it at a target several feet away. Rotate the tool slowly; if the beam traces a circle instead of staying in one spot, the laser is misaligned.
A loose fit can cause the same symptom, so check that the support holds it steadily.
Can you collimate a laser collimator yourself?
Many laser collimators have small adjustment screws that let you correct alignment at home, but the process depends on the model. Follow its instructions, use the correct tool, and make very small changes while repeating the rotation check.
If the screws are sealed or the tool cannot hold alignment, contact the manufacturer.
Does a laser collimator need to be collimated?
Yes, a laser collimator needs to be aligned if its beam shifts as the tool rotates. An off-center beam can lead you to adjust a telescope's optics incorrectly.
Check the collimator before relying on it, especially after a drop or rough transport.
Can an uncollimated laser damage a telescope?
A misaligned laser usually gives a false reference rather than harming the telescope by itself. The risk is adjusting the telescope's mirrors based on that false reference, leaving the optics out of alignment.
Keep the beam away from eyes, and never look into the laser or point it at another person.